Author Archives: heather @ 15 minute cheapskate

About heather @ 15 minute cheapskate

Hi! I’m Heather. I’m a mom of four kids, four chickens, and Rudolph the Wonder Dog. I currently work outside of the home, but I’ve also been a stay-at-home mom for 15 years. And whether I’m punching a clock or punching bread dough, I’ve tried to save money. But saving money is a lot of work. So, over the years, I’ve found a lot of shortcuts to save on food, clothes, crafts, and more.

10 great ways to use your tax return

Use your tax return to save money

The average US tax return is over $3000. Chances are, you’ve got some money coming to you from your tax return.

I know, I know. Financial planners say that tax returns are bad. It’s an interest-free loan to the government.

Problem is, if you earn a certain amount and have kids, you can usually expect a return.

What we do is use our tax return to help save more money. Here are some of the ways that we’ve used our tax return to save us money for now and later:


1. Pay down or off some debt

You’re probably rolling your eyes. This is the canned answer, right? Of course you should pay down debt. But that’s no fun.

Or is it?

Like me, you hear about how many thousands of dollars are wasted in credit card debt. You may cringe and mutter that you really need to pay that debt down. And you avoid it, because debt is just too overwhelming.

But if you can pay off a debt, no matter how small, it can really make a difference in your overall financial health. This last year, I paid off a credit card. That paid debt saved me $80 a month in interest payments. I was so excited! I wanted to show off my $0 balance. Too bad that’s not as acceptable to share that on social media as fancy vacations and big renovations.

Potential savings:  $1000 dollars a year or more

2. Buy a deep freezer

Buying a deep freezer was one of the best things I did with my tax return. With a chest freezer, I was able to save 35% off my grocery bill, since I could buy meats and vegetables at their lowest price and freeze them. Plus, I now had the room to store freezer meals. Even with the annual cost of operating, my freezer paid for itself in a year.

Potential savings:  $1600 dollars a year

3. Buy a canner

In addition to a deep freezer, you may want to get a canner to help preserve meats and vegetables. I’ve canned with a water-bath canner for years, putting up pickles and jams. However, I’d never attempted to use a pressure canner (You need a pressure canner to can meat products and many vegetables). I was terrified that it would blow up on me. But a few years ago, I used my return to get a pressure cooker. Why did I wait so long? It’s so easy to can a batch of chicken stock.  I’ve saved a lot of money canning spaghetti sauce with meat and dried beans. Having all this food on hand keeps us from going out to eat when we’re too busy for more than a quick meal.

Potential savings:  $500 dollars a year

4. Create a medical emergency fund

A lot of people avoid going to the doctor because they are uninsured or under-insured. I understand. We are on a high-deductible plan and end up paying out-of-pocket for our medical bills.

However, most people in this situation tend to wait as long as they can to go to the doctor, because it’s too expensive. Then, the problem because so critical that they end up in the emergency room after hours.

According to debt.org, the following are nine of the most common reasons people visit the ER:

  • Allergies
  • Acute bronchitis
  • Earache
  • Sore throat
  • Pink eye
  • Sinusitis
  • Strep throat
  • Upper respiratory infection
  • Urinary tract infection

Unless you are immune-compromised or have other medical complications to consider, all of those conditions can be treated for far cheaper in a doctor’s office.  The average cost of going to the ER was $1300 in 2009. It’s estimated that Americans could save 18 billion dollars a year by using primary care physicians over the ER. Wow!

ERs are a far pricier option than going to the doctor in the first place, especially since the average cost of a doctor’s visit is $100. Stash a few hundred dollars from your return for an emergency medical fund and you’ll have that available when a medical crisis arises.

Potential savings:  $1200 dollars

5. Start a buy-in-bulk fund

Grocery shopping one day, I found a display of ground beef for $1.25 a pound. $1.25 a pound! So I loaded up my shopping cart with 100 pounds of ground beef. Sure, I got some strange looks from the cashier. But I knew that I wouldn’t be able to beat that price for a long time. I froze the meat, and we’ve eaten it over the last year.

Even at the great savings of $1.25/lb, dropping $125 on meat would take a serious bite out of my monthly grocery budget. I never would have been able to do it had I not had a chunk of money set aside just for this purpose. If you take $200 and stash it in an account, you have that money to spend when you stumble upon a fantastic grocery deal. You could even replenish your bulk buying fund bit by bit with the savings that you’ve gained with purchasing items at their lowest price.

Potential savings:  $250-300 dollars

6. Tackle some home repairs

A little drip can turn into a big problem under your sink, if you let it continue. But if you spend the money to fix that leak, you can save hundreds of dollars in major repairs. We had a soffit (that’s the wood or siding underneath the eaves) that needed repairing. It costs us about $150 to repair it using a handyman. But if we had waited, we could have had serious damage to the roof, costing thousands of dollars. Other repairs that can save you money in the long run are fixing cracked toilets, re-caulking tubs, and re-staining kitchen cupboards that have had the varnish rubbed off.

Potential savings:  $500-2000 dollars

7. Tackle some car maintenance

Confession time here: When I bought my first car, I budgeted for the car payment and for the insurance payment. I didn’t think about maintenance costs. I avoided taking the car in for oil changes and checkups. After all, that cost money that I didn’t have.

So we drove the car for four years, when clunk! We broke a timing belt. Our car was dead.

If we had kept up with regular maintenance, we could have saved thousands of dollars, as we scrambled to purchase a replacement vehicle that we weren’t ready.

Use your return to inspect and replace brake pads, transmission fluid, or any number of car maintenance repairs that your car might need.

Potential savings:  $6000 dollars a year or more (a car payment or expensive repairs)

8. Add to the house fund

You’ll probably want to pay off other debts earlier, but if your mortgage is your only debt, you may want to throw a chunk of change at that debt. Even though the payoff date may seem years away, you can shave thousands off your interest paid. For example, I used this calculator to see what would happen if I put $3000 down on my mortgage. Just that one payment would save me $6347.58 in interest over the life of the loan. NO investment that you’d make gives you over a 50% return!

Potential savings:  $3000 + dollars  

9. Pre-fund your Christmas fund

Christmas used to stress me out. No matter how much I tried to save on gifts by shopping smart or making homemade alternatives, I’d always be faced with spending a huge chunk of change at the end of the year. Now I tuck away a bit each month for Christmas. But if your budget is so stretched that it’s hard to save monthly, you can set aside some of your tax return to create a Christmas fund to draw upon in November and December.

The nice thing about having some money set aside for Christmas is that you can use it to buy gifts throughout the year. Believe it or not, but Black Friday is not the best time for bargains. You can pick up presents when you come across them marked down or on sale. Even though it’s April, I already have two gifts for my kid stashed away for December.

Potential savings:  $300 + dollars and your sanity (priceless!)

10.  Make your house energy smart.

We all know the advantages of an energy smart home.   Light bulbs are a good example.  For years we have purchased light bulbs and I always looked for those good sales that gave me 4 bulbs for a few bucks.  But when you examine it, the purchase of energy-efficient LED light bulbs makes a lot of sense.

The first thing you might want to do is log on the web page of your power company and see if they are running any incentive programs.  Ours ran a special where we were able to bring in a 4 pack of bulbs for about $5 as a one time special.  LED lights are really dropping in price.  A check on Amazon.com confirmed that you can now get them for around $2 a bulb.  That’s still far more than I like to pay. But, I ran the numbers and found a different story.

In my neighborhood, a normal 75 watt incandescent light bulb will cost about $32.85 a year assuming a 12 hour lighting day.  A comparable LED bulb will cost about $3.94.  Factor in the 30,000 hours of expected lifetime for a LED bulb and you’ll end up purchasing 30 more of the incandescent ones.      Check out this cool LED bulb saving calculator and run the numbers for the costs for your family.  http://www.ledwaves.com/pages/led-calc

You might also consider purchasing some motion sensing light switches.  We always followed the kids around the house saying “turn off the lights.”  My husband finally gave up yelling at the kids and took a trip to the hardware store and purchased new light switches.

Potential savings:  $100-500 dollars

If you spend your tax return in some of the ways that I suggested, you’ll find yourself closer to meeting your financial goals.

Leave a Comment

Filed under Uncategorized

Stay by Disneyland for cheap, part 2

save at staying at disneyland part2

This is the third post in the series, Doing Disneyland for cheap. Don’t miss Stay by Disneyland for Cheap and Travel to Disneyland for cheap.

In part 1 of Stay by Disneyland for cheap, I mention the ways you can save on hotel rooms. But there are other lodging options besides hotel rooms. Here are some options that we’ve tried:

Alternatives to hotel rooms

Timeshares

We’ve had a lot of success renting available rooms in a timeshare. There’s no need to own a timeshare in order to rent. We’ve been able to rent rooms listed on eBay for $120 a night that sleeps eight. You could also find rooms on TripAdvisor and other condo rental services.

Camping

My family took their crew of six kids to Disneyland for our summer vacation the year that I graduated from high school. The only way they could manage it was to stay at a campsite.

If you already have the camping equipment or trailers, camping for your Disneyland can save you a lot of money. Plus the mild California weather makes it easy to camp year-round. You could stay on a beach or in the hills. Most spots range from $30-$60 a night.

The downside of camping for your Disneyland vacation is that these sites tend to be farther away from Disneyland than most hotels. Plus, it’s camping. If you think roughing it is not having turn-down service, you won’t like camping.

Here are some of the areas’ sites available (arranged by distance to Disneyland):

Irvine Lake – $25 per night PLUS a daily fishing fee per person. 16 miles from Disneyland.

Note: Since there is a mandatory daily fishing fee per person ($24 per adult/$11 per kid), this option is not as economical as other options.

Featherly Regional Park – $75 per night cabin/ $60 per night RV. 20 miles from Disneyland.

Bolsa Chica State Park – $50-65 per night. 21 miles from Disneyland.

Note: Campers/trailers only.

O’Neill Regional Park – $20 per night. 29 miles from Disneyland.

Doheny State Beach – $35 per night. 34 miles from Disneyland.

Caspers Wilderness Park – $20 per night. 37 miles from Disneyland.

San Clemente State Beach – $35 per night. 39 miles from Disneyland.

San Onofre State Park – $65 per night. 40 miles from Disneyland.

Note: This was the area that my family stayed. It was fine; we got sand everywhere and sometimes the drive to Disneyland seemed very long. But it was easy to take a beach day between Disneyland days and just relax.

RVs

The only way that my brother and his brood of 8 travel to Disneyland is by motor home.  This allows them to stay together without having to rent multiple rooms. And they travel enough with their motor home to  consider it a good purchase for their family (They go to Disneyland at least two or three times a year).

If you own or can borrow an RV (Motor home or tow trailer), this would be a great option for you. Renting an RV may be more expensive than a hotel. However, if you want to rent an RV, this excellent article from TripAdvisor talks about the various costs you can expect when renting.

Most of the state parks listed above have spots for RVs. There are also several RV parks in Anaheim.

Relatives

If you have relatives in Southern California, you might consider staying with them. If you go with this option, make sure not to take advantage of your patient relatives. Offer to buy Disneyland tickets for them, so they can join you. Or pay for dinner out with them. At the very least, you should buy groceries.

As you can see, there are lots of way to save money on lodging for your Disneyland trip.

Next post: Disney pass discounts.


Be sure to subscribe to my newsletter to get all of the Disney posts for this series!

Leave a Comment

Filed under Uncategorized

Stay by Disneyland for cheap

stay by disneyland

This is the second post in the series, Doing Disneyland for cheap. Don’t miss Travel to Disneyland for cheap.


Now that you’ve gotten to sunny California, where do you stay?

That’s the question, isn’t it? You don’t want to sink all your vacation money into a place that you’ll be spending very little time. However, there are ways to save money.

Finding deals on hotels

Starry-eyed Disney fans swear by staying at one of the three Disneyland resorts because of the “magic.”

Problem is, all that “Mickey magic” costs money. And unlike staying at Disney World, staying at the official Disneyland hotel delivers few benefits.

You should stay off-site.

One booking issue that we have is that we don’t have the two adults/two kids dynamic that most hotel rooms want. In order to avoid getting two rooms, we end up renting a suite. Even though suites are more expensive, they’re less expensive than two rooms.

Work out the search engines

The first step in finding the best prices on hotel rooms is to go to the internet. Choose your favorite hotel search engine, like hotels.com, kayak.com, or priceline.com.

Not only can you try general search engines, you can try specific Disney travel sites. We often use getawaytoday.com . For example, comparing the same room at the Cortona Inn and Suites, I found:

  • $235 a night through Hotels.com
  • $198 a night through getawaytoday.com

The nice thing about booking with getawaytoday.com is that you can get packages with Disney tickets. The Disney packages usually has one early entry day. If you book the room at the Cortona Inn and Suites with Disney tickets, you’ll pay $190 a night.

But no search engine will return the lowest price every time. Make sure to search several engines for the best deal.

Walking versus driving

Almost every hotel in the Anaheim area claims to be close to Disneyland. Many people think if that they get close to the park, they can avoid parking fees at Disneyland. You can find hotels from 1/2 mile to a mile from the park.

And at first, it makes sense. Three-quarters of a mile doesn’t seem far on that first morning walking to Disneyland. But when you’ve spent all day walking around Disneyland, that three-quarter mile walk seems like a death march. And it’s not just the fatigue. One late night, as we dragged ourselves to the hotel room, we were accosted by two big young guys who asked for money for the shuttle.


Also known as the Please Don't Mug Me Tax

Also known as the Please Don’t Mug Me Tax

Yeah, that’s not an experience I want to repeat.

But if you stay at a hotel that’s farther away, you can save more money than what you would spend on Disneyland parking fees. Hotels just a few miles away from Disneyland cost $50-$100 less a night than hotels close to Disneyland. This price difference more than makes up for the $17 a day in Disneyland parking fees.

Other things to consider

I try to book a room with the following amenities.

  • Breakfast – Most hotels that cater to Disneyland tourists offer some sort of free breakfast. Even if it’s a continental breakfast, that’s one last thing you have to worry about when getting out the door.
  • Fridge/Microwave – Although it’s hard to get a full kitchen suite in a hotel when going to Disneyland, you can get a mini-fridge and/or a microwave to help prep meals to save money.

Don’t worry about:

  • Shuttles to Disneyland – Many hotels have shuttles to Disneyland. The bad news is that the shuttle service is not free. If you’ve got more than a few people in your party, it gets pretty pricey to get to and from the park.

But hotels are not the only lodging option for your Disneyland vacations. Check out Stay by Disneyland for cheap, part 2.


1 Comment

Filed under Uncategorized

Travel to Disneyland for cheap

Travel to Disneyland for cheap | 15minutecheapskate.com

This is the first post in the series, The ultimate guide to doing Disneyland for cheap.

Disneyland is not for everyone.

Wait! Let me explain.

For those of us living in the continental United States, we’re lucky to have two Disney amusement parks: Disney World and Disneyland.

Frankly, Disney World is much bigger. If you live in the eastern part of the United States, it doesn’t make a lot of sense to go to Disneyland. It’s much closer and cheaper to go to Disney World.
disneyland-world map
But for the rest of us, there’s the original park. Here are the best ways to save getting there:

If you drive. . .

Driving is by far the cheapest option to get to Disneyland. That’s one of the primary reason why you should go to Disneyland if you live in the western United States. Even if you come from Washington or Texas, it’s only a two day drive to get to Anaheim. You could do the cross-country trek, but for your sanity I wouldn’t recommend it.

Not only do you save airfare when you drive to Disneyland, but you’ll have a vehicle to get around in Anaheim. The car culture in Southern California is legendary — you can’t get anywhere without a vehicle. Having access to a car allows you to get cheaper food and cheaper lodging. If your own vehicle isn’t an option to drive, you can rent a car. Even with the additional cost of the car rental, you’ll still save lots of money over airfare. In fact, when we drive to Disneyland, we always rent a roomy SUV or minivan (depending on what’s available). With the extra elbow room, this gets our crew to California with a minimum of pit stops and bloodshed.

Here’s the breakdown of traveling with my family of six during a week in July:

  • Drive our own vehicles – $200 in gas (we don’t have a car that fits six, so we’d have to take two cars)
  • Drive a rental vehicle – $439 plus $100 in gas = $539
  • Fly – $1446 plus $202 in shuttle fees to and from the airport= $1648

Ouch! Even with renting a car, we save over a thousand dollars getting to California by driving.

If you fly. . .

But what if driving isn’t an option for you? You may be traveling to Disneyland from outside of the western United States or can’t afford the extra time it takes to drive. You can still cut costs on your airfare:

Fly mid-week

Most people will schedule their vacation around the work/school week (like Monday-Sunday). However if you’re willing to depart midweek, you can save a lot on your airfare. The cheapest days to fly are usually Tuesday, Wednesday, and Saturday. If you schedule your flight to and from on these days, you can save $50-$100 or more per ticket. I book flights first, then I book the hotel to get the best prices. Just open Google, put in your departure and arrival times, and play with your schedule to get the best prices.

Fly one-way instead of round-trip

This year, my daughter had a cheer competition in Anaheim. Because of the competition, she had to fly back on Sunday, one of the most expensive days to fly. A round-trip airfare would cost us $350. However, we found if she flew out of our local airport, she could get a one-way flight to California for $120. That airport didn’t have a return flight on Sunday, so she returned by flying into an airport 50 miles away. That flight was $170. The total for both one way flights was $290 — a savings of $60 per trip.

Compare airports

Not only can you save on your flight by the day you fly, you can also save depending upon the airport that you fly into. There are three airports that serve the Anaheim area:

  • John Wayne airport – 14 miles from Disneyland
  • Long Beach airport – 24 miles from Disneyland
  • LAX – 34 miles from Disneyland

When you check airline flights, be sure to check flights for all three airports. John Wayne may be the closest to Disneyland, but flights tend to be more expensive than from LAX or Long Beach. Long Beach is a much smaller airport, and you can get good pricing if you are flying from other Western cities. However, you may not get a great flight (or even a flight at all) if you fly into Long Beach from the East Coast. LAX is a big international airport, and is a great bet for flights from outside of the United States or from back east.

Fly through Las Vegas

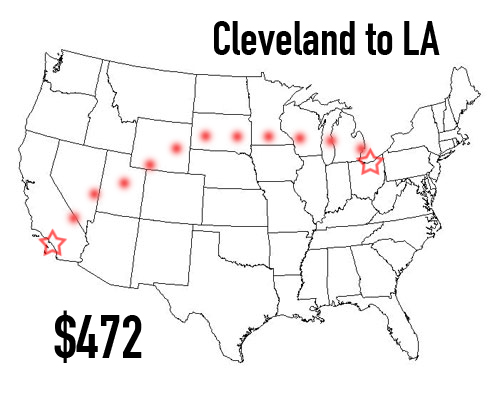
Instead of flying directly into Southern California, stop in Las Vegas. Why? Because flights in and out of Vegas are some of the cheapest flights in the country. And Orange County is only a short four hour drive from Vegas. Just rent a car and drive the rest of the way. For example, check out the map below for a typical flight from Cleveland, Ohio to Los Angeles:

Cost of traveling round trip from Cleveland to LA

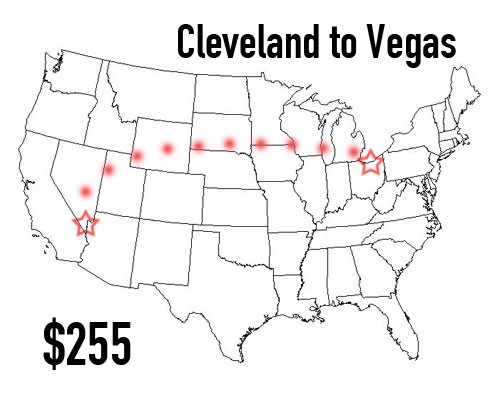
You can see that the flight is almost $500. And that’s to LAX. Flights to John Wayne were even pricier. Now let’s compare flying to Las Vegas from Cleveland:

Cost of flying from Cleveland to Las Vegas

That’s a savings of over $200! There are many discount airlines, like Spirit and Frontier, that fly into Vegas but may not fly into Southern California.

Other flight tips

FareCompare  has a page on general flight booking tips that you should also check out.

Getting there is just the beginning. . .

As you know, getting to Disneyland is just a part of your vacation budget. Check out the other posts in my series to save on lodging, food, and more!

1 Comment

Filed under Uncategorized

Doing Disneyland for cheap

Save so much on your Disneyland trip this summer! | 15minutecheapskate.com

When Disney raised the price of admission to Disneyland this past spring, I could almost hear an audible sigh rise up throughout the country. Really? Isn’t Disneyland expensive enough?

I feel your pain. Disneyland is my family’s favorite destination, and I’ve been lots and lots of times. Over 20 times, in fact. I’ve toured the Dream Suite (my brother’s family got to stay there one night). I’ve gone on the busiest days of the year, with both little kids and big kids in tow. We’ve flown in and driven, and stayed at all sorts of accommodations.

So  in order to not go bankrupt during a Disneyland trip, I’ve honed my ninja cheapie skills to a sharp edge. And now, I’m passing along all my tricks to you.

This is the first post in my series on how to do Disneyland for cheap. By following my suggestions, you can save hundreds of dollars on your trip. Be sure to sign up for my newsletter so you don’t miss a single post! You can also bookmark this page and hit the links for the latest posts. I’ll be writing about:

  • Getting to Disneyland for cheap
  • Staying by Disneyland for cheap (Part 1 & 2)
  • Buying tickets for cheap
  • Making the most of your time in the park
  • Eating on your vacation for cheap
  • Buying souvenirs for cheap

This post has been listed on:

Works for Me Wednesday on Giving Up On Perfect

Thrifty Thursday at Living Well Spending Less

The Handmade Hangout at Too Much Time on My Hands

Link Party Palooza at Tatertots and Jello


2 Comments

Filed under Uncategorized

Bountiful Baskets – May 9

Bountiful Baskets May 9

  • It feels good to bring you another Bountiful Baskets post, especially after the April that I lost due to illness. And oh boy, we’ve got a great basket this week!
    Sweet peppers – Since I’ve got a lot of chopped sweet peppers tucked in my freezer for cooking, I’m going to turn these beautiful orange peppers into freezer stuffed peppers, like this
    recipe from The Frugal Pantry .
  • Baby Portobellos – These were one of my favorite items in the basket this time. I think I’ll saute and make them the star in a quick pasta. Yum!
  • Heirloom cherry tomatoes – The little container above the sweet peppers is filled with heirloom tomatoes. I’ve had mixed success with these little buggers. Some, like the dark Black Cherry tomatoes are sweet and thin skinned. Others like the Snow White and Green Zebra ones are a little more thick-skinned. I’l probably hoard the Black Cherries for salads and add the rest chopped to my portobella pasta dish. (Fun idea – the last time I got a box of heirloom cherry tomatoes, I saved the seeds from the Black Cherry and started a tomato plant. It may be too late in the year to grow a producing tomato plant from seed, but you could certainly save the seeds for next year, as shown in this slide show from Seed Savers Exchange. )
  • Watermelon and pineapple – I’ll save these for a tropical fruit salad later in the week.
  • Apricots – I toyed with the idea of making up apricot chicken freezer meals, but decided against it. It’s one of the few fruits that we got this week that my kids can just grab and eat without a lot of prep work. So, I’ll leave the apricots for snacking.
  • Rainbow carrots – This was the other item that I was excited about. Did you know that carrots originally were purple, yellow, orange, and white? The orange carrot that we know today is a result of hybridization. I’ll use these throughout the week as I would regular carrots. They would be yummy in a lunch with hummus and radishes straight from the garden.
  • Oranges – Because we’ve been eating oranges since December, my kids have been ignoring these lately. I think I’ll juice them and freeze for the hot summer months, when an orange smoothie or orange chicken hits the spot. See my article on oranges for more information on how to do this.
  • Butternut squash – However, I’m still not done with pumpkin taste. I’m baking these as I type, and will freeze the flesh in 1/2 cup portions. Since we are moving into warmer weather, I’ll probably make Pumpkin Overnight Oatmeal from The Fountain Avenue Kitchen.
  • Mangos – As we were putting the mangos away, my daughter put her hands on her hips. “Mom,” she said. “The mangos are ripe. We hafta eat them for breakfast.” How could I argue with that? So we did, with mangos topping our whole wheat pancakes. We have two green mangos left, so’ll we’ll eat them later in the week when they ripen.
  • Red potatoes. I’ll serve these as a side dish with a pea gravy (one of hubby’s favorites).
  • Romaine lettuce – I prepped this for storing, such as shown in my post, “Keep Lettuce Fresh with Kitchen Hack.” It will be such an easy prep for salads later in the week.

How will you use your Bountiful Basket this week?

2 Comments

Filed under Uncategorized

Pineapple chicken freezer meal

freezer meal pineapple chicken
Hello everyone! I’m so sorry that I haven’t posted in a while. I’ve spent the last few weeks sick. Like going to bed on Saturday and waking up on Wednesday type of sick. I spent most of the time making muffled hacking noises and drooling on my pillow.

While I was sick, I had serious issues with dinners. It’s not because I didn’t have food. I had plenty of prepped meat and vegetables in the freezer. I even had some freezer meals prepared. But my family was at a loss as to what to make for dinner.

The instructions on my freezer meals just weren’t clear enough. Usually when I make up freezer meals, I scrawl something like Bake at 350 or the name of the freezer meal on the plastic, since I know how to prepare most of the meals. This just didn’t cut it when I was incapacitated.

So I’ve resolved to start making freezer dinners more family-friendly. Something that even my junior high kid could cook if needed. The first meal? Pineapple chicken.

There are lots of pineapple chicken freezer meals on the web. However most pineapple chicken meals involve dumping the contents in the crockpot. I like crockpot freezer meals as much as anyone else. But cooking chicken in the crockpot causes it to shred. And I don’t like shredded chicken for Asian dishes.

This meal takes about 15 minutes to prep, and 15 minutes to cook.

To prep meals for the freezer

This recipe makes up three meals – one for now and two for the freezer. You can adjust it as needed. Each meal serves 6 and costs $3.52 per meal.

You’ll need:

  • Freezer bags – gallon size
  • Freezer bags – quart size
  • Sharpie or permanent marker
  • Printout here – pineapple chicken download
  • 3 lbs boneless chicken breasts or thighs — $5.25
  • 3 bell peppers — $1.50
  • 3 20oz cans of pineapple chunks, juice reserved — $2.99
  • 6 Tb soy sauce — $.12
  • 3 garlic clove, minced — $.24
  • 1 Tb grated ginger — $.11
  • 1 Tb cornstarch — $.04
  • 6 Tb brown sugar — $.12

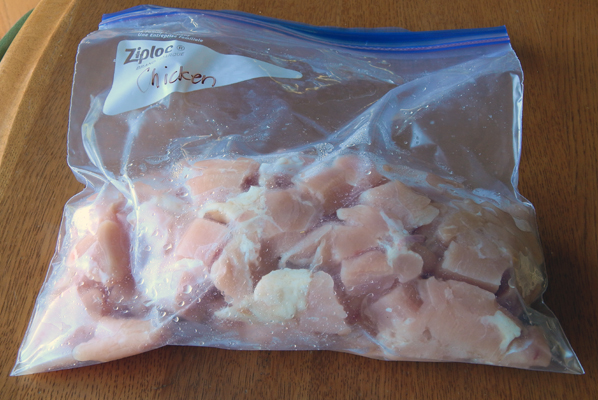
First, cut up the chicken into bite-size chunks. Divide among three quart freezer bags. Seal and mark the chicken bags. Set aside.

freezer meal pineapple chicken

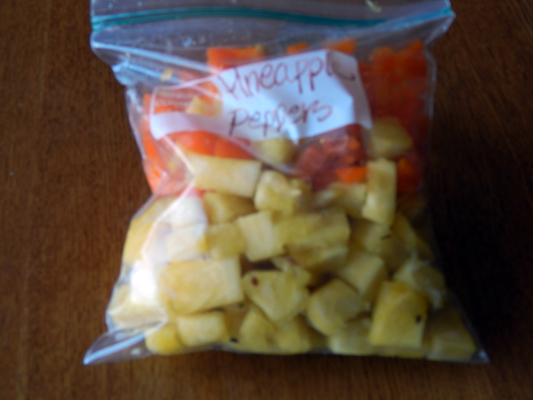
Drain the pineapple and set the juice aside. Divide the pineapple among three quart freezer bags. Chop and seed the bell peppers. Divide between the pineapple bags. Seal and mark the vegetable bags. Set aside.

freezer meal pineapple chicken

Next, prep the sauce for freezing. Combine brown sugar, pineapple juice, soy sauce, garlic, and ginger in a small bowl.

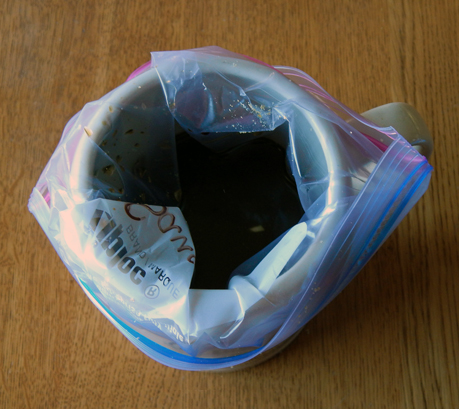
Here’s a tip when prepping liquids for the freezer: line a cup with an empty freezer bag and pour the liquid in the cup. This keeps the liquid from spilling when you pour. A third of the sauce needs to go into the freezer bag. Seal and mark the sauce bag. Prep two more sauce bags and set aside.

sauce in cup

Place 1 tsp cornstarch in a quart bag. Since you don’t have to worry about freezer burn for cornstarch, you can place the cornstarch in a quart sandwich bag.

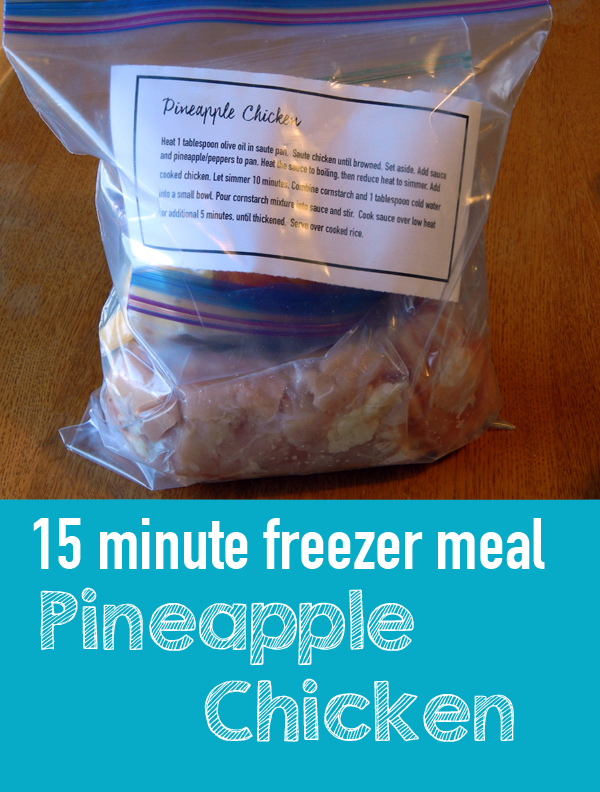
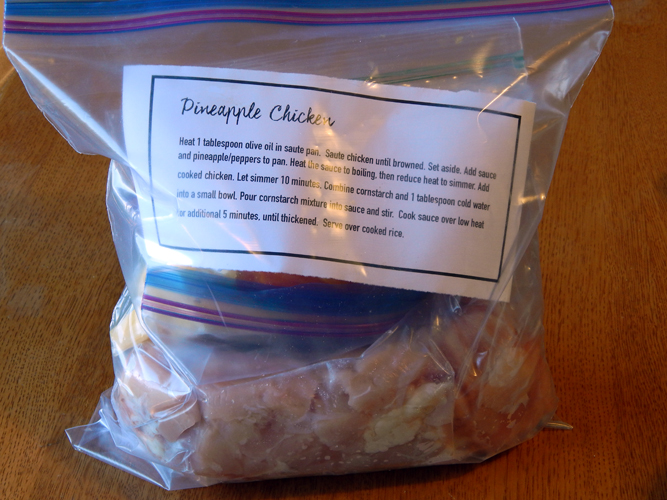
Place a bag of sauce, a bag of chicken, a bag of pineapple/peppers, and a bag of cornstarch into a gallon size bag. Place one of the cooking instructions from the PDF in the gallon bag with the rest of the quart bags (The instructions should keep dry). Bag the next two meals. Freeze.

This is best served over cooked rice or cauliflower rice. If you’d like, you can bag the uncooked rice, write instructions for cooking the rice, and tuck into the gallon bag. You can also fill a quart bag of prepared cauliflower rice and add to the gallon bag.

chicken package

pineapple chicken printable

You can find this post at:

1 Comment

Filed under Freezer Cooking

FREE printable iron-ons for onesies!

Free printable iron-ons for cute baby onesies!
I love to give presents that I can make for far less than I can buy. So when I was invited to a baby shower, I took the time to make up some cute little onesies. Because a new mom can’t have too many onesies!

I created some graphics to iron on the onesies and printed them out on my inkjet printer. Now you can make your own onesies with these free iron-on printables that you can download here!

I’ve found personalized onesies for about $10 an outfit. But you can make your own for far less. You can pick up basic onesies in a package of three for $9. Iron-on paper runs for $2 a sheet. For $11, you’ve got a present that’s worth $30.

Here’s what I’ve done:

I thought that these emojis accurately reflect baby’s state sometimes.

emoji onesie

But it’s not all tears. . .there’s nothing sweeter than a baby’s laugh.

giggle
Here’s another one:
sweetie pie onesie
And how bout this one?
button
And here’s a couple for the back of the onesie. This butterfly graphic I downloaded from The Graphics Fairy and altered it for the back.
butterfly
Here’s some adorable angel wings.
angel onesie
Oooh! I just want to dress up a little one in one of the these outfits and nuzzle his or her cute little neck! ( I swear I’m not baby hungry!)
The iron-on paper can be a big expense — $10 for 5 sheets. However, I’ve positioned the printables, so you can print off either two or four graphics per sheet. This brings the cost of the printables down to 50 cents to a dollar a graphic. Plus, you can get iron-on paper at craft stores as well as office supply stores, and use those JoAnn’s and Michael’s coupons to lower the cost of the paper even further.

I’ve been asked what paper I use. I’ve had a lot of success with Avery Dark Fabric Transfers paper. I like this brand because you can print transfers for dark T-shirts. But this paper works great for iron-ons on light T-shirts as well. There’s no need to reverse the image when you print graphics out on the Avery dark T-shirt.

The iron-ons I created for the shower are gender-neutral, but I’ve also made some blue and pink graphics for you as well. You’ll also notice that some of the graphics are reversed and some are not. That’s because some T-shirt fabric transfer paper require you to reverse the graphics. However, you don’t need to reverse the wings graphics.

Just print what you need. These graphics fit most sizes of onesies, although the butterfly wings and angel wings might be a little too big for a newborn onesie.

Download  here –> baby onesies download

To download the PDF:

  1. Click the above link.
  2. When the PDF appears, right-click the image and select Save as. Save the document to your desktop or folder.

You can select the pages that you want to print, or print all of the pages.

You are more than welcome to use the graphics for personal use only. Create a few onesies for personal use or for gifts. And I’d love to see what you’ve done with the iron-ons!

I’ve had so much fun making up these graphics that I’ll be featuring more posts with onesie iron-ons for you to use. Be sure to watch for those upcoming posts. I’ve got so many ideas! Plus, I’m taking requests. (My daughter has already requested little dragon wings for the onesie’s back)

What’s your favorite design?

This post contains affiliate links. If you purchase the item through the link, there is no additional cost for you, and I get a little extra.

You can find this post over at:

Works for me Wednesdays at Giving Up On Perfect

Penny Pinching Party at The Thrifty Home

Thrifty Thursday at Living Well Spending Less

The Handmade Hangout at Too Much Time on My Hands

Link Party Palooza at Tatertots and Jello


2 Comments

Filed under Sewing

Raise chickens for cheap

raising chickens for cheap

A few years ago, we jumped into the whole suburban chicken farming movement But it took me a while for me to commit. . (I have a philosophy of not bringing any creature into our place unless I’m prepared to deal with their poop.)

One of the reasons why I dragged my feet on getting chickens  is because I was afraid of the start-up costs.

When I first started investigating raising chickens, I calculated my first-year costs for four chickens, including feed, housing, and other essentials. The total was $804. For the year, that would work out to $32 a dozen for eggs.

Ouch.

Fortunately, I was able to reduce my costs significantly. Here’s how you can do it too:

1. Build a chicken coop

A coop will be your biggest upfront cost. Even if you free-range your chickens, you really need a chicken coop to protect your birds from weather and predators. Pre-built chicken coops can cost $400 and up. You can save some money and order a pre-fab chicken coop to assemble yourself for half that cost. But you can save even more by building the coop on your own. Just Google free chicken coop plans to find a plan that works for you. Even with new wood, the costs for a new coop can be just 50 dollars. Use pallet wood or reclaimed wood to bring the cost down even lower.

But does building a coop from scratch (no pun intended) intimidate you? Then you should try:

2. Hack an existing structure into a coop

We built our chickens’ run (the outside pen that chickens run around in) However, we didn’t feel like we could tackle a coop. Fortunately, we knew someone who had decided to stop raising chickens, and they gifted us their old coop ($0).  If you’re not so lucky to get a free coop, try to modify an existing structure into a chicken coop.

Chickens only need a few things in their coop:

  • Basic shelter
  • A place to roost
  • A nest box

Because of this, you can modify all sorts of items to create a coop. You can:

  • Reclaim an old shed that’s falling apart
  • Turn an old plastic sandbox into a coop
  • Convert one of those big 90’s TV entertainment centers
  • Use an old swing set for the frame of a new coop
  • Turn an old plastic playhouse into a coop
  • Or a trampoline

Look on freecycle.org for cast off items that you can repurpose into a coop.

3. Start with pullets

What are pullets? Well, you can think of pullets as chicken teenagers. Like teenagers, they are not as cute as babies  and they are more expensive. Around here, you can get baby chicks for $1 and pullets for $3-$4.

So why do I recommend pullets over chicks? For two reasons:

  • Baby chicks are delicate. They require extra care, a brooder (which costs), and special feed. You can’t turn them loose outside. They take a lot more effort. Plus, the mortality rate is a lot higher for baby chicks. I would hate to explain to my kids how that cute little chick died without warning under their care.
  • It’s easier for the chicken farmers to tell gender on a pullet than a chick. When you get your chickens as chicks, there’s a 50% chance you’re raising a rooster than a hen. On pullets, you are 75%  likely to get a hen. More on that importance later.

4. Use cheap bedding alternatives

At the feed store, they’ll sell you a big pack of pine shavings to put in the nesting box for the chickens to sit in, as well as the floor of the coop. It’s the same stuff that you use for lining hamsters’ cages. Unlike hamsters with their little pellets of poop, chickens poop a lot. And it’s messy, so you’ll be changing bedding often. That big bag of pine shavings will dwindle pretty quickly. However, you can supplement the bedding with cheaper alternatives. You can use:

  • straw (if you can get it for cheap)
  • dry pine needles
  • shredded dead leaves
  • mown grass (make sure that the grass is nice and dried out. Green grass will clump and smell)
  • shredded paper and cardboard (even your kids’ old papers!)


Beats the old "The dog ate my homework," excuse, eh?

Beats the old “The dog ate my homework,” excuse, eh?

5. Feed chickens table scraps

A bag of feed will last my little flock of four birds one month if that is their only food source. However, chickens love variety, and will eat lots of things that you have designated for the compost pile. Some of the things my chickens love:

  • leftover cooked rice and pasta
  • stale bread
  • cabbage cores
  • the wilted outer leaves of lettuce
  • broccoli and cauliflower leaves
  • vegetable peels, like carrots and cucumbers
  • celery tops
  • apple and pear cores
  • watermelon and cantaloupe rinds
  • leftover popcorn (including the unpopped kernels)
  • weevil-infested grain
  • and on and on. . . .

It’s easier to list what they shouldn’t eat. They’ll even eat eggs and chicken (shudder) but I avoid that. You should also avoid feeding them:

  • onions
  • potato and potato peels
  • avocados
  • raw meat
  • spoiled food

You shouldn’t just feed your chickens table scraps. They do need store-bought feed. However, supplementing their feed really helps stretch the food budget.

6. Let the chickens loose

chickens eating

The flock eliminating every potato bug within a city block


In addition to feeding your flock table scraps, you should let them roam around your yard and scavenge. Chickens love bugs and finding their own green stuff.

By feeding my flock table scraps and letting them free-range, I can stretch a bag of feed  to last two to three months.

7. Have an end plan

Chickens only lay eggs for four to five years. But they can live for 20 years. If you get chickens for eggs, you need to plan for the time that they stop laying.

Don’t plan on giving them away. Our Humane Society is swamped with old hens. . .a sad byproduct of overeager suburban chicken farmers who didn’t think ahead. I know of one person who lets his old hens out in a state park. . to go “back to nature.” That’s a terrible idea! Not only is it illegal, but it’s cruel to the chicken. How do you think the chicken will fend for herself in the wild when she’s been raised depending on you for food and shelter?

It’s a hard thing, but you have to be prepared to take the ax to your chicken when it’s time. Or else you will have feathered pets for a long time.

And you may have to do it sooner than you realize. Remember how I mentioned that you should have your chickens sexed beforehand? It’s not an exact science to determine whether you have a girl or a boy bird. You may end up with a rooster.

Many municipalities don’t allow roosters, and I don’t blame them. Growing up in Southern California, we had neighbors who had a rooster. That %$^# thing crowed at all our hours, not just at the crack of dawn.

So when we got our chickens, we started noticing that one of our chickens, Roadrunner, was looking a little masculine. She started getting thicker feet and comb, and she started bossing the other chickens around. We kept thinking that it was because she was the head of the flock. Then one morning, she hopped up and gave us her best crow. We couldn’t deny it any longer. We had to dispatch him.

Not a fun experience, but it had to be done. I now know that I couldn’t raise chickens for meat, and I’m not looking forward to getting rid of the rest of my flock. But it’s a reality when you raise chickens.

_____________

Unlike vegetable gardening, the cost benefits of raising chickens for eggs are not so cut-and-dried. You are not going to beat grocery store prices of $1.19 a dozen. But if you want organic and free-range eggs, raising your own eggs actually may save you money. Plus, you get the benefits of all that free chicken manure for your garden and lawn.

And there are those intangible benefits, such as teaching your children where their food comes from. When you raise chickens for eggs, those chickens have a far better life than factory birds–even free-range factory birds. It’s something that I’ve tried to strive for, especially after reading Animal, Vegetable, Miracle: A Year of Food Life by Barbara Kingsolver.

Lastly, chickens are just fun. Each chicken has her own little personality. Isabelle loves to tell us when she’s laid an egg. Tyrone jumps up onto everything, including my head. Salt and Pepper are the first ones to come running when I scatter grain.

It may cost us a little more per egg, but for our family, it’s worth it.

What are your experiences with raising chickens?

Note: This post contains affiliate links. If you purchase something through these links, I get a little extra and it’s no additional cost to you.

I’ve shared this link on:

4 Comments

Filed under Uncategorized

Bountiful Baskets – March 21

Bountiful Basket for March 21
Peppers, peppers, and more peppers!
Got my Bountiful Basket Saturday, and here’s the spread. I was stumped on what to do with some of the items. See that huge white carrot-like vegetable? That’s a daikon radish. Thankfully daikon are a lighter tasting radish than round radishes. So I peeled the radish and prepped it for munching, along with the celery. I like to take some hummus and cut up vegetables for lunches.

I also made pickled daikon. Picked daikon is used a lot in Asian cuisine. It’s usually eaten with ramen and bahn mi, a Vietnamese sandwich. I used this recipe from White On Rice Couple.

The Anaheim peppers are a more complicated matter. I already have a lot of Anaheim peppers chopped in the freezer and I only use 1 or 2 Anaheim peppers per meal.

So, I’m roasting, peeling, and freezing the whole Anaheim peppers and using some in a chili relleno casserole later this week. I’ve read that you can freeze chili relleno casseroles, but I want to run this recipe by my family before committing space in the freezer.

Other items that I prepped:

Froze the strawberries for later breakfasts, smoothies, and desserts.

Washed and prepped lettuce for salads during the next week. Hey, worked out great with the empty strawberry containers!

The pineapple is green, so I’ll keep it on the cupboard until it ripens.

Blanched the asparagus and froze it for later in the week. Also chopped up the red peppers and froze them. They’ll be great for fajitas.

I juiced the lemons and froze the juice.

I’ll use the potatoes in a potato leek soup.

And the apples? The apples will be gone by midweek. My kids love fruit, and will eat it before I have the chance to do something with the apples.

What will you do with your Bountiful Basket?

Related Posts Plugin for WordPress, Blogger...

Leave a Comment

Filed under Uncategorized